Seven Tips for Applying Marine Caulk
With a little knowledge, you can easily apply marine caulk or sealant.
Of course, if you aren't up to it, we can help.
Here' are some tips.
Thanks to Kevin Falvey Boating Magazine
Sooner or later the need to apply caulk, sealant or adhesive arises in every boater’s life. Here are some tips for making the job go easier.
1. Reef the Seam
Remove the existing bead of caulking with a reefing tool or reefing hook, either bought or made. I have used an old-fashioned can opener or a shop-made tool created by heating the shaft of an old screwdriver and then bending it at a right angle in a vice. Fein MultiMaster and Dremel also offer seam-reefing accessories.
2. Remove Residue
To ensure a good bond and seal, use a solvent to remove any residual skin of the old sealant. Lacquer thinner or mineral spirits work for most polysulfide and silicone sealants. Adhesive sealants may require specialty products: Check product labels. Wear protective gear when working with solvents and be mindful of fire hazards.
3. Mask Borders
Apply masking tape 1/8 inch to either side of the seam to be caulked. For rounded corners, “overmask” at a right angle, and then use a jar cap or other guide with a utility knife to carefully cut out the radius. Masking takes time, but using tape ensures easier cleanup.
4. Cut the Tip
Too many DIY boaters cut off the caulking nozzle tip wrong. It’s important to examine the tip and cut it at the point that is just a wee bit narrower than the width you need. Also, cut the tip at about 45 degrees. The actual hole should be an oval, the narrow dimension of which is just narrower than the seam or bead.
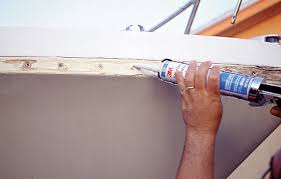
5. Push, Don’t Pull
In most cases, a neater result can be achieved by pushing the caulking gun while applying the caulk. Press just hard enough so that the speed at which you are pushing doesn’t exceed the rate of caulk being delivered from the tip. Ideally, there should be a slight “hill” or “ball” of caulk just in front of the tip as you move it along. Practice on scrap if you haven’t done much caulking.
6. Tooling Time
The time to tool — that is: fix, neaten or modify — the bead of caulk you applied is the time it takes the caulk to begin to skin over and will vary by brand and type and environmental conditions. Swipe the bead with a gloved finger dipped in water to smooth the bead. Wipe fingers clean between swipes. Be sure to peel the masking tape before skin-over also.
Caulking dries and cracks and should be renewed periodically around bilge and fuel tank hatches, ports, windows and the hull-to-deck joint.